
How Transactions Work
Transactions can be added manually by hitting the (+) icon and typing in the transaction data or by confirming a transaction synced from your bank.
Automatic matching
When transactions sync from your bank, if they match the amount and have a date close to a manual transaction, Weekly will match them together to create a single transaction. This can be helpful if you like to add transactions into Weekly whenever you make a purchase and let your bank transactions sync later.
Manual matching
You can also match a bank transaction with a manually input transaction even when the amounts don’t match. Simply select Safe-to-Spend or Fund when reviewing the bank transaction. A list of manually entered transactions with a date close to the transaction date will appear below. Select the matching transaction and confirm.
Weekly will ask you if you’d like to update the transaction amount to match the bank transaction amount.
Why is a transaction deleted?
Sometimes transactions are marked as deleted if they’re no longer returned from your financial institution. This can happen when a pending transaction is transitioning to a posted state, or if a pending transaction never posts at all (like a hold for gas or a hotel).
If you’ve already confirmed a transaction that is now deleted, the deleted transaction will still appear and be part of your budget. If you don’t expect the transaction to get posted, you will want to remove the deleted transaction.
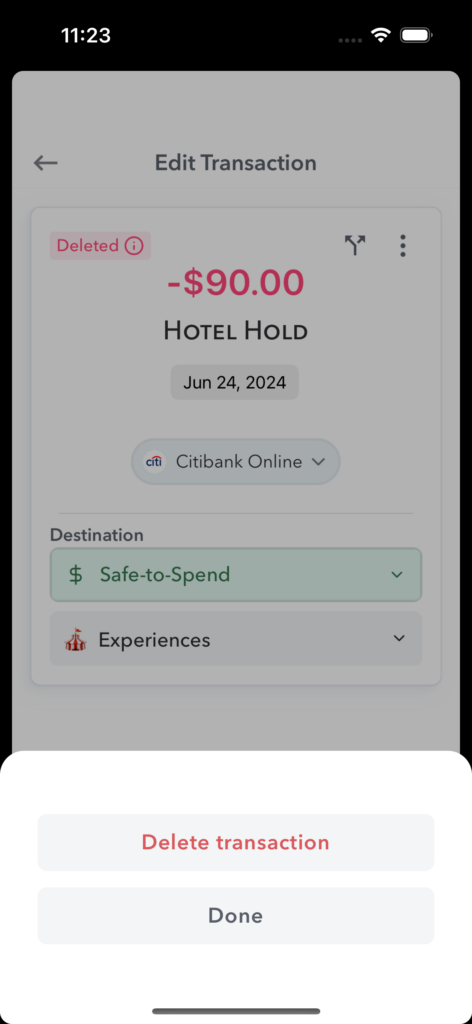
To remove a deleted transaction simply open the transaction and tap the three dots in the top right. Then select “Delete transaction”. This will remove the transaction and recalculate your Safe-to-Spend or fund balance.
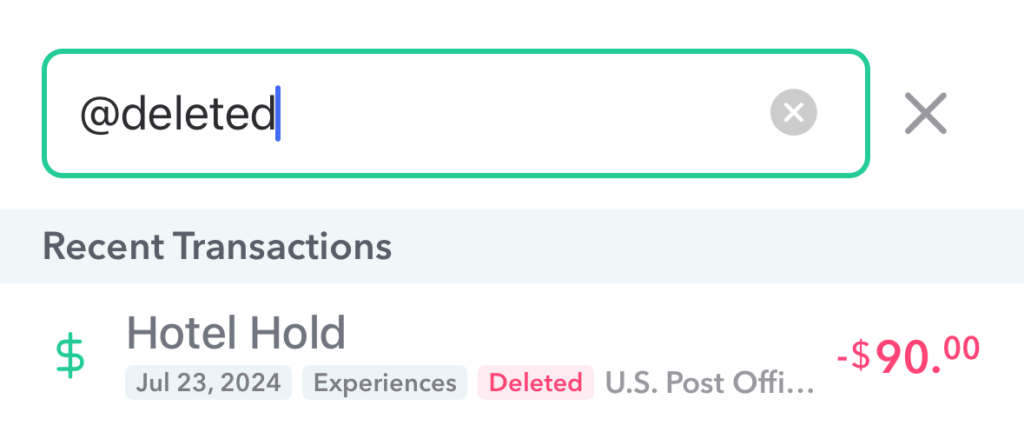
You can easily see all your deleted transactions with the global search. Tap the search icon on the dashboard or swipe down on any main screen to show the global search. You can use the keyword @deleted (or @d for short) to filter only deleted transactions.
How do I review bank transactions?
Many budgeting apps automatically update your budget with new transactions from your bank. This can make it difficult to understand why your budget has changed and what new transactions came in since the last time you looked at your budget.
Weekly takes a different approach to support mindfulness and accuracy. Each time Weekly syncs new bank transactions you’ll receive a notification to review them. You’ll see a list of all the new transactions on the review page and be able to mark them as safe-to-spend, recurring, or ignore.
Safe-to-Spend
Transactions for day-to-day spending like groceries, gas, and entertainment should be marked as Safe-to-Spend. You may also have irregular income like birthday money from grandma that you’ll want to put here as well.
When you mark a transaction as Safe-to-Spend your Safe-to-Spend amount will be updated and you will see the transaction listed on the Dashboard under “transactions”.
Funds
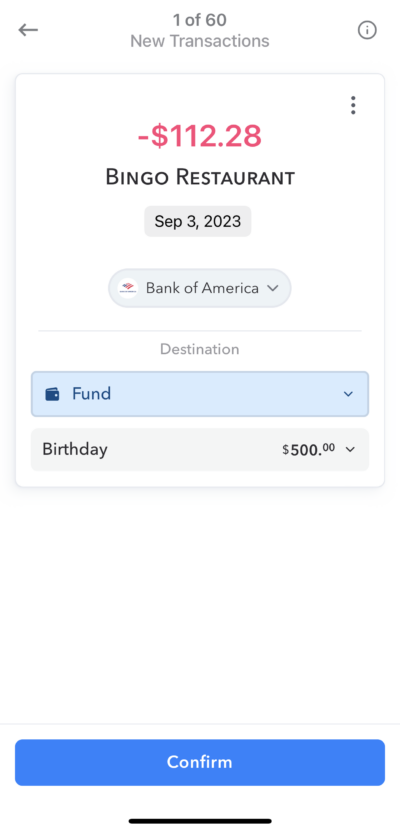
Bank transactions can be added directly to a fund. Select “Fund” and then select the fund you want to put the transaction in. (Locked funds don’t appear in this list.)
If you’ve manually created any transactions in the fund, you’ll have the option to match the bank transaction with it, or your can create a new transaction.
Recurring
Transactions for your regular income or recurring expenses should be marked as recurring. When a transaction is marked as recurring it does not update your Safe-to-Spend since it’s already been accounted for in your weekly spending limit calculation.
If a recurring transaction matches the amount for an existing recurring expense or regular income, you’ll see a suggestion button you can tap to quickly select that recurring item. If the transaction does not match the amount of your recurring item, simply select “Recurring” then tap on the recurring item the transaction is for. Weekly will give you the option to update your recurring item to keep your weekly spending limit up to date.
Ignore
Transactions for credit card payments or internal account transfers don’t affect your spending and can safely be ignored. You may also want to ignore other transactions like one-off income that you simply want to save in your bank account.
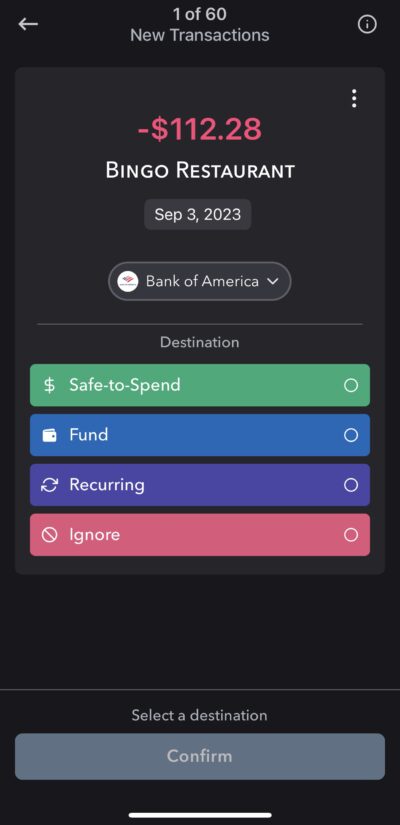
Reviewing Bank Transactions
When new transactions happen and are downloaded into your bank, the next step is review them so that you can keep know where you are at in your weekly and monthly spending.
The process to review transactions starts with the transaction view.
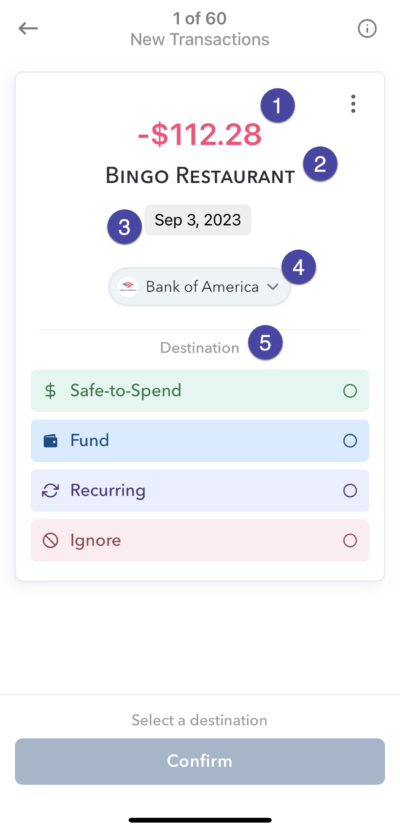
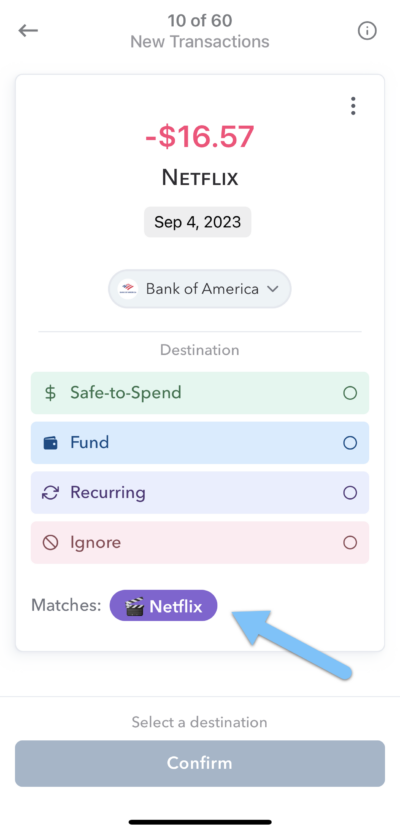
The transaction view show you details about your transactions and allows you to “file” it in the right place. Here’s is a breakdown of the screen.
-
Amount – This is the amount of the transaction.
-
Description – This is who you paid the money to.
-
Date – The date of the transaction
-
Bank or Credit Card – Where they money was spent from. If you tap on this, you will see a full description of the transaction data as received from your bank.
-
Destination – This is how you want to classify the transaction in Weekly.
Advanced note: It may not be a common occurrence but if you ever wanted to change the amount, the description or the date of the transaction, you can by tapping any of those and and it will bring up the editing interface.
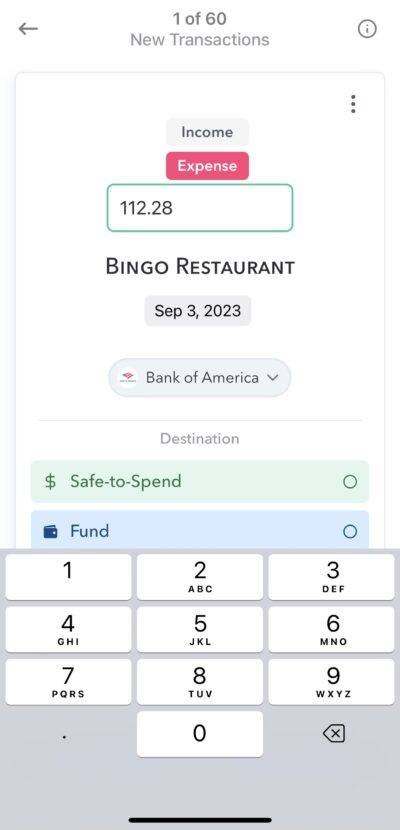
Now, we will go through the classification options in detail.
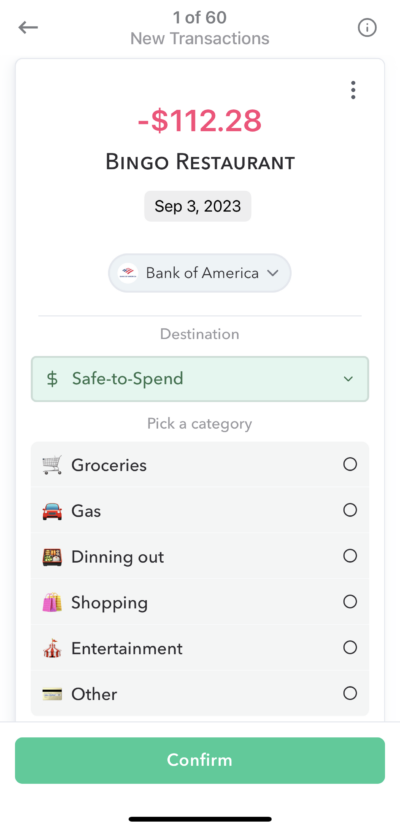
Destination – Safe-to-Spend
If this is a day-to-day transaction and not a recurring (aka committed) expense, then you will probably want to take this from your Safe-to-Spend balance (or a fund … more on that later).
To map a transaction to your Safe-to-Spend simply tap Safe-to-Spend. If you want to assign a category to the transaction so that you can see how you have been spending in different categories over time, you can next choose the category for the spending and then tap “Confirm”.
Destination – Fund
If this transaction is related to something you have saved up for in a fund, you can chose “Fund” as the Destination and then choose which fund to “pull” the money from.
Destination – Recurring
If this transaction is related to a recurring (aka committed) expense that is already in your account as a budget item, select “Recurring” and then choose the Recurring budget expense that it matches.
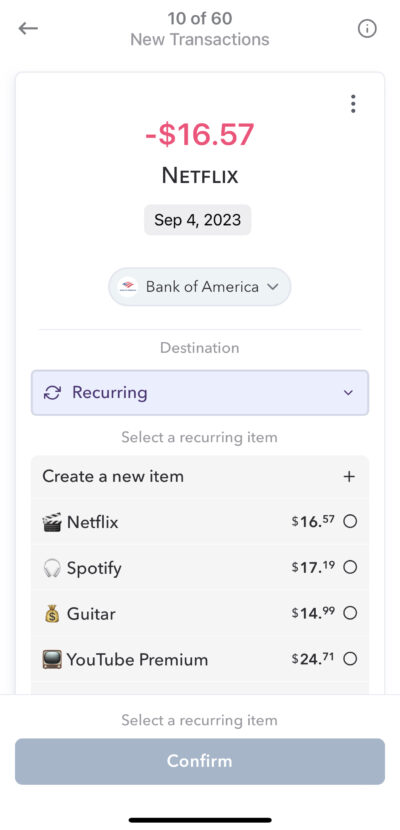
Sometimes Weekly will attempt to match up the transaction to a recurring expense for you and will show a purple “pill” at the bottom that shows what Weekly thinks it is for. Tapping that pill will automatically select Recurring and the recurring items it is for.
Destination – Ignore
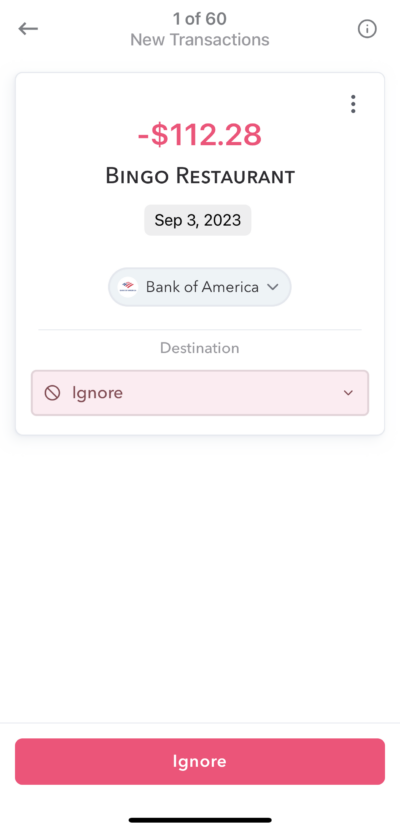
Finally, if you want to ignore this transaction so that it doesn’t get taken from your Safe-to-Spend, a fund or mapped to a recurring expense, choose Ignore. We will keep store this transaction if you ever need to change its destination but if its in ignored status, it will not be used in any of the calculations in Weekly.
Conclusion
Reviewing transaction is vital part of keeping tabs on your spending. Weekly makes the process of reviewing transaction easy while at the same time making sure you know what’s happening in your budget.
Transaction Review List
Weekly provides a fast way to review transactions by listing each one along with the primary suggestion. You can confirm through transactions quickly by tapping the suggestion destination, or tap on the transaction itself to see the detail and change the destination.
Where to find the Transaction Review List
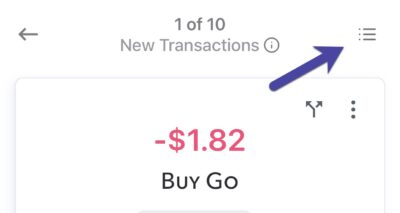
You can find the Transaction Review List by tapping the bullet list icon on the top right of the Individual Transaction Review screen.
Transaction Review List
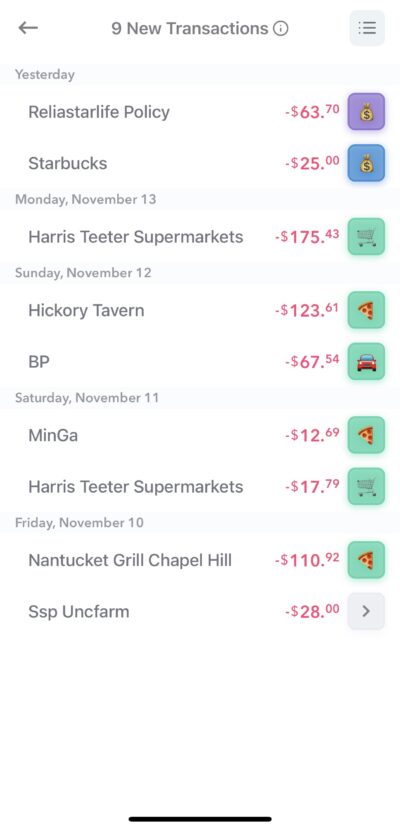
This list has all the unreviewed transactions for the selected week. The label from the bank is on the left, and the amount and the suggestion square are on the right.
Transaction Review Squares
The suggested destination and categorization for a transaction will be indicated in the suggestion squares.

The color of the square indicates the Destination.
- Green indicates a Safe-to-Spend transaction
- Blue indicates a you want it map the transaction to a Fund
- Purple indicates a Recurring Expense budget item
- Red indicates ignoring the transaction
The transaction suggestion is based on the Suggestion rules which can be adjusted.
The emoji in the square indicates which specific category the item will be assigned to. You can setup the emoji associated with categories, funds or recurring expense items on the respective management pages.
So for example, by default Weekly has a pizza emoji to represent the “Eating Out” category and the grocery cart to represent “Groceries”.
Accepting a suggestion
Tap the suggestion square to confirm the transaction. and the icon will be replaced with a checkmark. You can tap it again to revert the change.
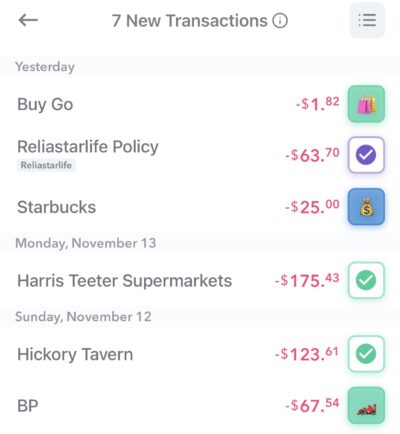
If you need to change the destination you can tap on the vendor or anywhere left of the icon and it will bring up the individual review screen again.
The bulk transaction review screen aims to make reviewing new transaction fun and easy. By tapping suggestion squares, you quickly accept Weekly’s destination suggestions allow you to quickly move through your transactions and keep on top of your spending.