
Editing Transactions
Sometimes a bank transaction includes multiple charges that you want to categorize separately. Weekly supports splitting transactions so you can categorize them accurately. The split feature supports:
- Splitting a transactions as many times as you’d like
- Assigning each transaction to any destination (Safe-to-Spend, Fund, Recurring, or even Ignored)
- Each split transaction will show in the proper reports and search results
- Editing and deleting split transactions
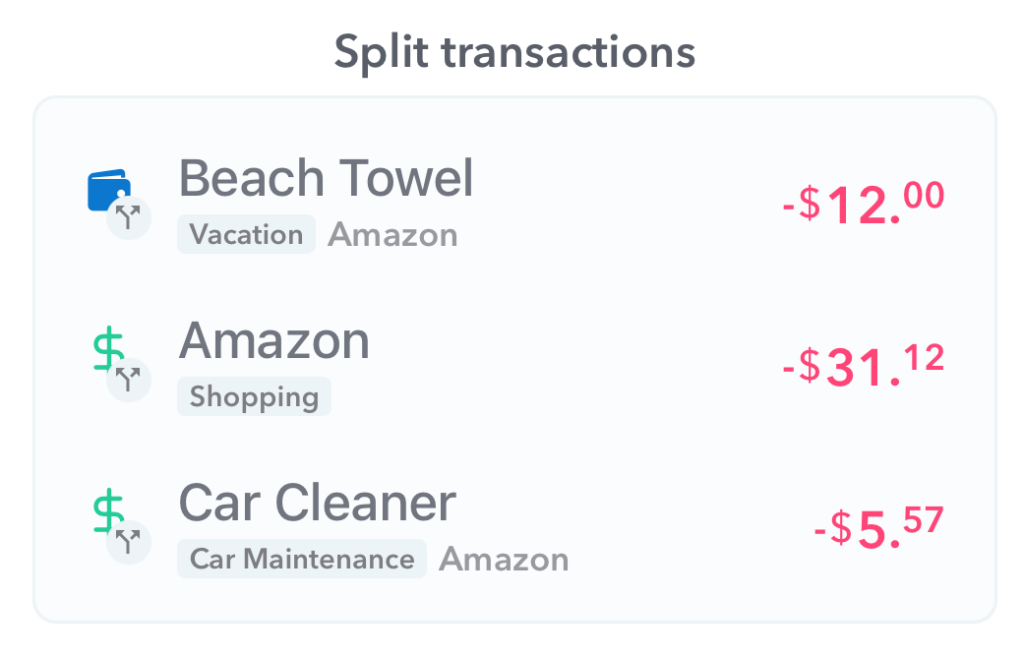
Splitting transactions can be useful when:
- You have a single purchase with items that you’d like to categorize separately
- A charge includes multiple subscriptions (i.e. Apple often bills for multiple subscriptions in a single transaction)
- You have extra income on a regular income payment that you want to assign to a fund
How To Split a Transaction
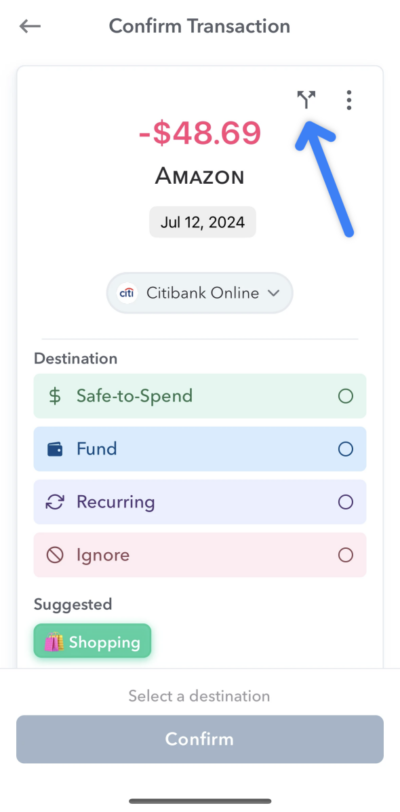
When looking at a bank transaction detail page there’s a split icon on the top right. Tap this icon to open the split transaction screen.
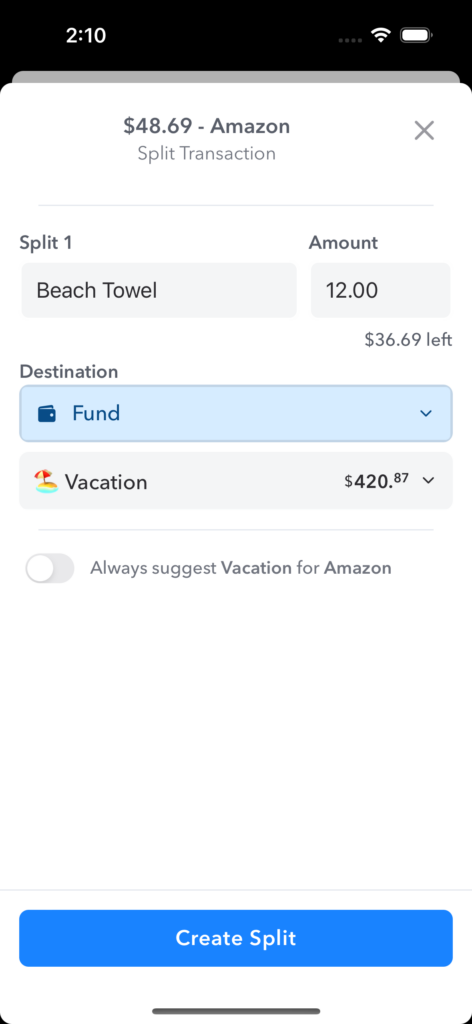
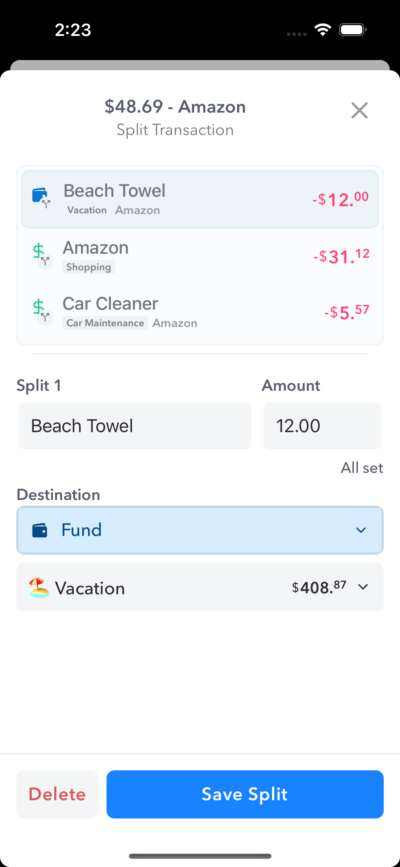
From the split screen you can define an amount and optional name for each split. There’s a prompt below the amount input that indicates how much of the total is left. After setting the amount pick the destination you want and tap “Create Split”.
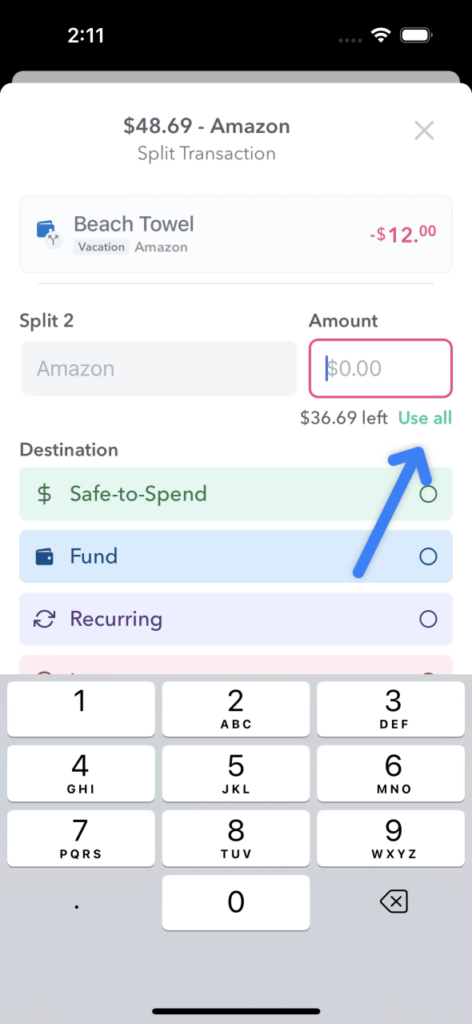
On subsequent splits you’ll have an option to “Use all” of the remaining amount. Simply tap the link to use the balance of the transaction.
You can split the transaction as many times as you like until the entire transaction amount has been used. If you need to edit a split, just tap it from the list above, make changes, and tap “Save Split”.
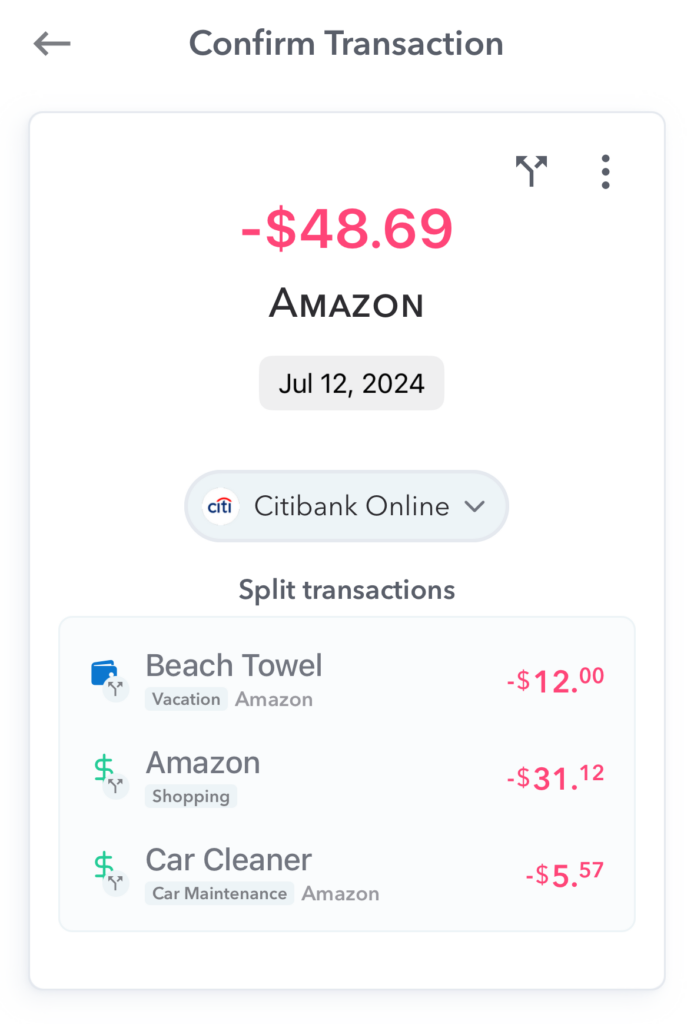
Once you’ve used the entire split and saved, the split modal will dismiss and you’ll see the original transaction information with all the splits below it.
Conclusion
Split transaction helps you deal with real-life transaction scenarios and organize them in Weekly to make your reporting and tracking more accurate.
Export Transactions to a CSV
Weekly has the ability to export your transactions to a .csv file to use with your favorite spreadsheet program. Having an export of the data you put into Weekly can unlock your ability to do your own analysis. For example, you could use your export to do monthly reconciliations, build your own reports, and filter or categorize data to your heart’s desire. The export includes lots of data including the transaction date, amount, how it was categorized (Safe-to-Spend, Recurring, etc.), which bank account it was linked to, and a category assigned by your financial institution (see below for a full breakdown of all data).
What you can do with exported transaction file
Here are a few ideas of things you could do with the exported file from Weekly.
- Category reports – Create a report to help you see how much you have spent in each of the bank categories.
- Monthly reconciliations – Create a report that shows all your income and expenses over a month.
- Searching transactions – Search through all transactions and see how they have been categorized within Weekly
- Filtering transactions – Ever wanted to see all your recurring transactions in one place? Add filters on your spreadsheet to see just your recurring transactions, fund transactions, or any other grouping.
How you get the CSV file
First tap the menu icon in the top left and then tap “Settings”. Under “Settings” you will see “Export transactions”.
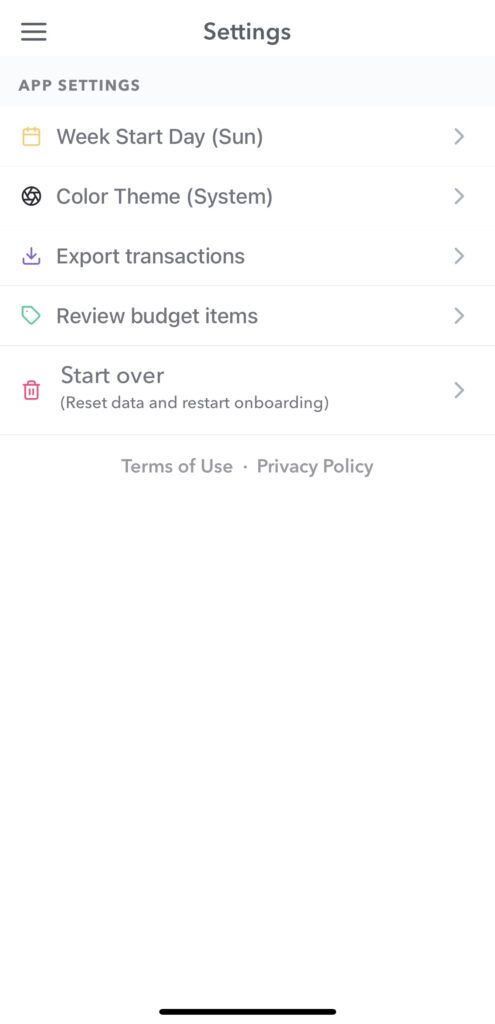
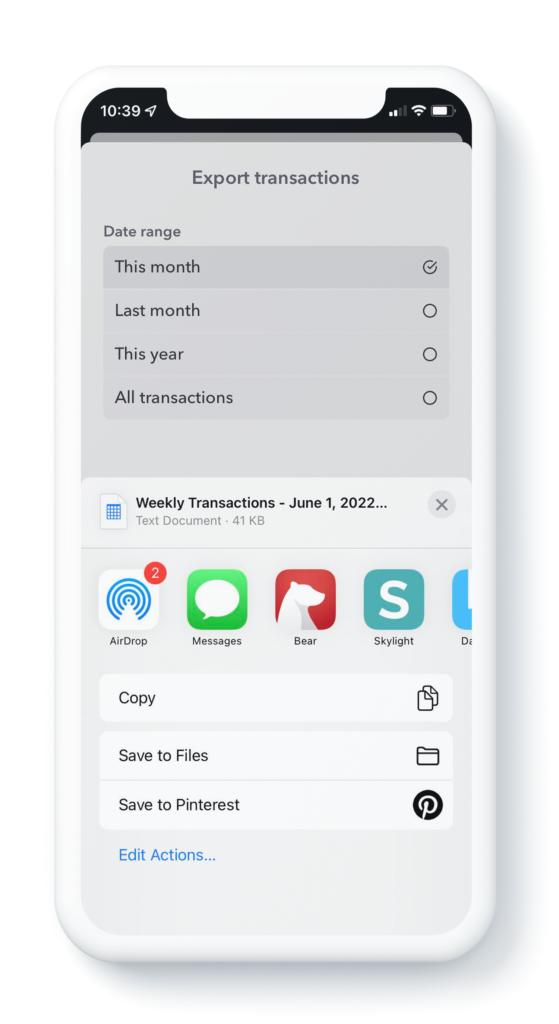
Tapping that “Export transactions” will bring up the date range options where you can then choose if you want to get transactions for “This month”, “Last month”, “This year” or “All transactions”.
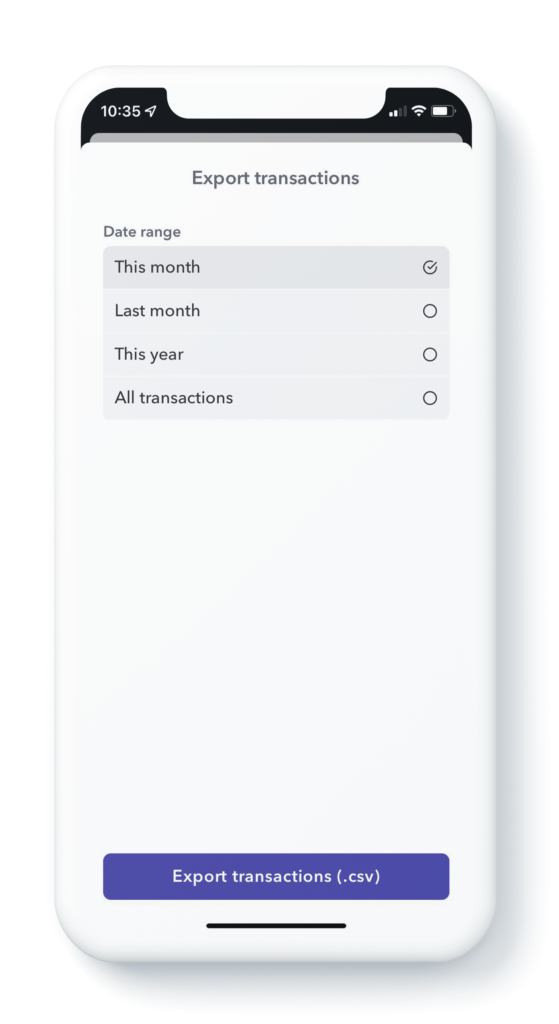
Make your selection then tap “Export transactions (.csv)”. After the file is downloaded you’ll have the option to share the file using all your native iOS sharing options (Airdrop, google drive, iMessage, etc.) For example, you can Airdrop it to your computer, email it, text it, save it to your files, or save it to another cloud drive (Dropbox or iCloud for example).
Data that is in the CSV
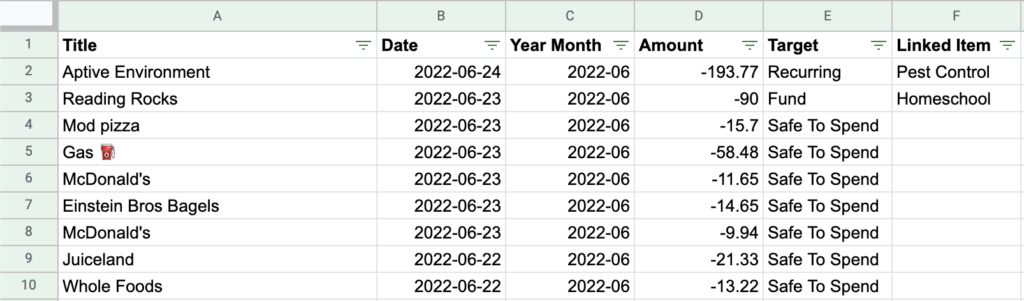
The data that comes in the CSV includes lots of information about each transaction including the category the bank associated with the transaction and how the transaction was handled in Weekly. Here is an explanation of the different types of data in the CSV.
| Column Heading | Column Description |
| Title | The title given by you to the transaction when the transaction was filed in Weekly. If the transaction was imported from the bank, this title will match the title given by the bank unless you have renamed it. In a manually entered transaction, this is the title given when you write in what the transaction is for. |
| Date | The date you gave the transaction in Weekly. In the case of manually entered transactions this is the date entered as the date of the transaction. In the case of imported bank transactions, this usually matches the transaction date given by the bank unless the user has changed it manually. |
| Year Month | This is the same information as the date field but only has the month and year. This makes it easier to filter based on the month to create a monthly report. |
| Amount | The amount of the transaction. This can be modified from the bank transaction amount. The amount of the bank transaction can be seen in the Bank Amount column. |
| Target | Where the transaction was “filed” in Weekly. I can be one of: InitialHasn’t been reviewed and filed Safe-to-SpendTransaction has been mapped to Safe-to-Spend.IgnoredThis transaction has been ignored.FundThe transaction has been added to or taken out of a fund. You can see the fund details under “Linked Item Name”RecurringThis transaction as been associated with a recurring income/expense |
| Linked Item Name | If the “Target” is a Fund or Recurring, this column will give the name of the item the transaction was associated with. |
| Original Transaction Amount | Occasionally, posted transactions have a different amount from the previous pending transaction. If this happens, Weekly will update the Safe-to-Spend or Fund transaction with the posted amount and the original amount will appear in this column. |
| Linked To Bank Transaction | This will be TRUE if the transaction is associated with a bank transaction and there will be data in the columns to the right. For manually entered transactions this field will be FALSE and there will not be additional data in the columns to the right. |
| Bank Title | This is the title of the transaction given by the Bank. |
| Bank Amount | The amount for the bank transaction. |
| Institution Name | The name of the financial institution the transaction was downloaded from. |
| Account Name | The name of the bank account or credit card that the transaction was downloaded from. |
| Bank Category | The spending category the bank gave to the transaction. |
| Posted Date | The data the transaction posted to the bank or credit card. |
| Bank Pending | TRUE or FALSE. TRUE means the amount might be updated to reflect final charges. |
| Merchant Name | The name of the merchant where the transaction was processed |
| Id | The unique ID given to the transaction by the bank. |
Summary
Exporting a .csv file from Weekly gives you the ability to see all of the transactions that have come into Weekly and then analyze them in your favorite spreadsheet program. Weekly is an excellent tool for helping managing your day-to-day spending habits. Exporting transactions for further analysis helps extend the usefulness of the app by allowing our users to do analysis that looks back to see how and where their money was spent.
Special Note
Have you created a cool spreadsheet report using the exported Weekly data? Would you like to share? Let us know; we would love to be able to post it and have other Weekly users use it!
How do I pay off a credit card in Weekly?
Whenever possible you should try and pay off your credit cards every month. This keeps you from accumulating debt and also avoids incurring interest charges.
If you pay off your credit card balance each month you will have two transactions for the payment. The payment expense from your checking account and an offsetting payment “income” transaction to your credit card. Since you’ve already accounted for the spending you can ignore both of these transactions.
Payments when carrying a balance
If you’re working to pay down you’re credit card and are carrying a balance you’ll want to take some extra steps. First you’ll need to decide how much you can pay off each month in addition to any new charges. Then you’ll make a recurring expense for this additional amount. Second you’ll want to create a recurring expense for the interest you will accrue each month while paying down the balance. These two recurring expenses will decrease your Weekly Spending Limit so you have the money set aside for those payments.
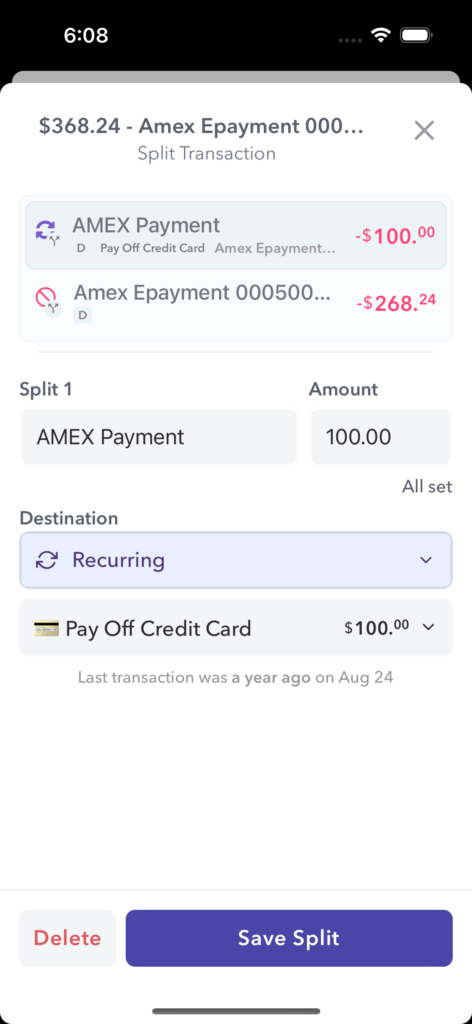
It may be a good idea to stop using the credit card that’s carrying a balance since you will accrue interest for all new charges until it’s paid off. If you are still using that credit card, you can review your statement to pay off all new charges from the past month, plus the additional amount you’ve decided to pay. If you make a single transaction you can split the expense when it syncs. Assign part of it to the recurring expense you set up previously, and the rest of it can be ignored.
Can I can change the date of bank transactions?
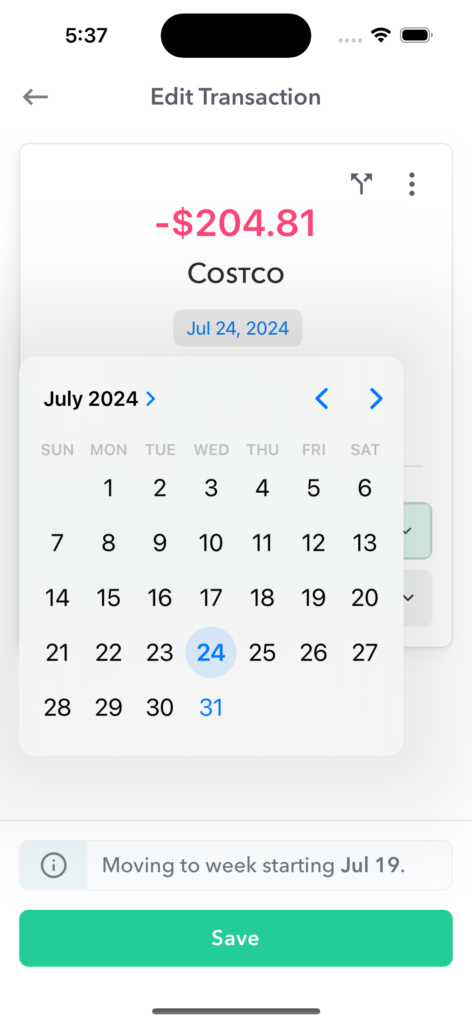
It’s easy to change the date for a bank transaction. Just tap the date on the transaction detail page and pick a new one! This can be useful in a few cases.
Sometimes transactions show up the day after they occurred, especially if the charge was towards the end of the day. You may also want to have your credit card payment transactions be on the same day for the Cash History report. This way the transactions offset each other and don’t cause spikes in the graph. If you have a bill that occurred a day early or later than usual, you can adjust that too.
If changing the date moves the transaction to a different week, Weekly will indicate that above the “Save” button. This will recalculated your Safe-to-Spend for that week (and subsequent weeks if your rollover is enabled).
How do I add a note to a transaction?
The UI for “adding a note” is basically just replacing the title. When you replace a title the original title change will be the main text listed in the transaction and the original title will become a subtext so you can will always know what the original charge was labeled.
To change the title of a transaction you simply tap it. The editing interface for changing the transaction’s name will appear.
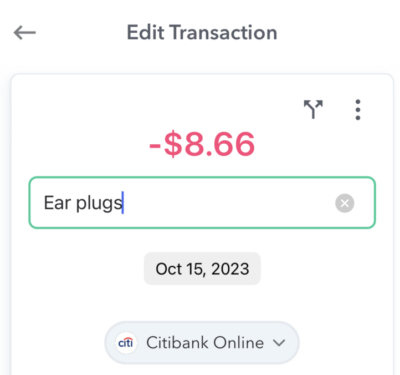
The transaction and the original title will become a subtext (as in this screenshot – original title was Amazon and note is “Ear plugs”).

When dealing with a split transaction, the text under the Split (Split 1 in screen below) will be the title.
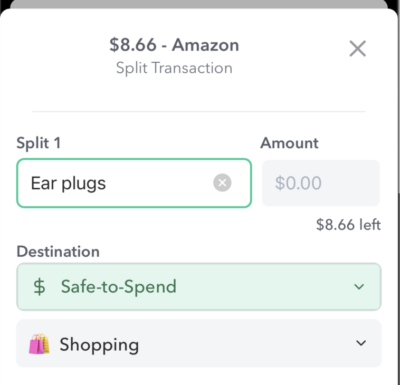
Changing the title of a transaction helps you label transaction in a way that can help you understand what it is for while keeping in tact the original transaction title delivered from the bank. This effectively helps you add a note or label to your transaction so you can remember what it was for.