
Budget Overview
The Budget page gives you a view of all the budget items in your budget and your weekly spending limit. From the Budget page, you can also adjust or add new budget items.
You can find your budget overview by tapping the “Budget” item at the bottom left of the screen.
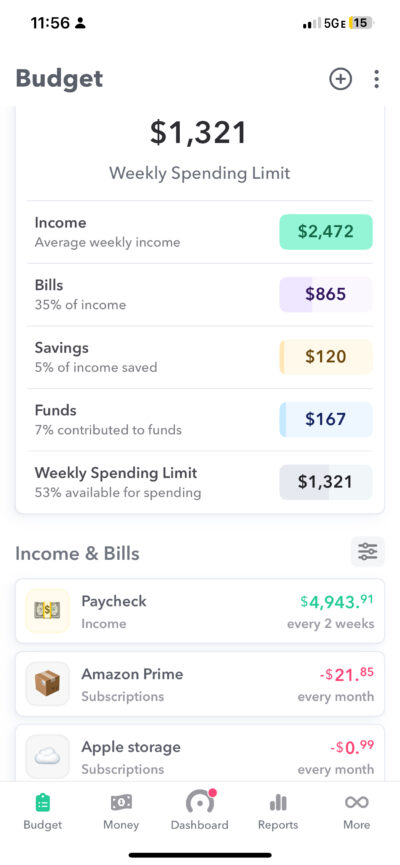
Budget Overview
The Budget page shows all budget items that compose your budget and that are used to calculate your weekly spending limit. You can view you budget numbers as either weekly or monthly amounts by tapping the three dots in the top right corner of the page to change the setting.
Let’s go thru each piece of the “Budget” screen.
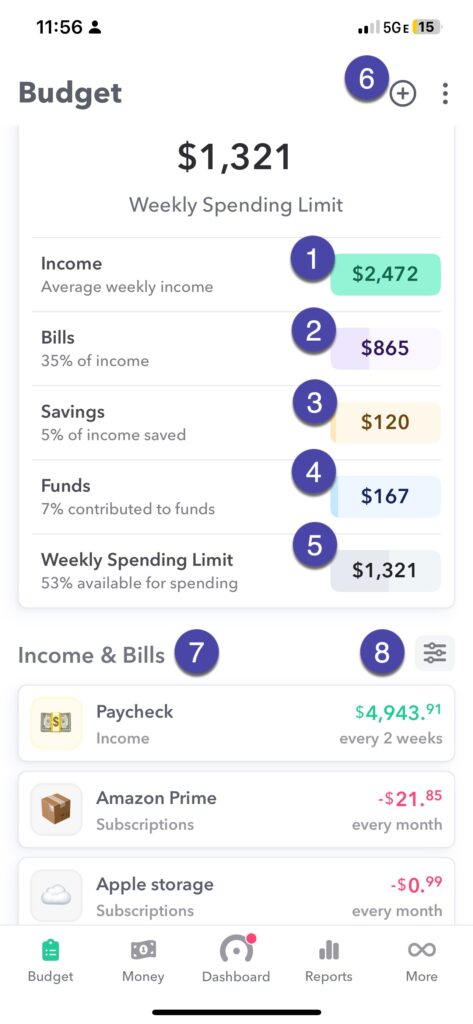
1 – Income
On the top line is the weekly average of your recurring income.
2 – Bills
The second line is the sum total of all your recurring expenses expressed as a weekly amount.
3 – Savings
Savings is the amount you want to set aside each week to build your Available Cash. Available Cash is money you are saving that has no pre-determined purpose. You can change the amount you are saving by tapping “Savings“.
4 – Funds
This line item is the weekly equivalent of all the money you are setting aside in your Funds.
5 – Weekly Spending Limit
Your Weekly Spending Limit is calculated by subtracting your bills, savings and fund contributions from your income. This amount is added to your Safe-to-Spend at the beginning of your week.
6 – Adding New Budget Items
Tap on the (+) button at the top right of the screen to add a new recurring expenses or income to your budget.
7 – Income & Bills
Your individual budget items shown underneath Income & Bills. Additionally if you want to see the items that make your Fund contributions you can tap on the item that says “Fund Contributions” underneath “Income & Bills”.
8 – Sort & Filter
You can choose to group your budget items together into their budget categories by tapping the Sort and Filter icon and then tapping “Group by Category”. You can also choose to sort your budget items by Amount, Weekly Amount, or Name.
Group and Sort Budget Items
On the budget overview screen, you have the option to group and sort your budget items. Here’s a guide to your options. To find this interactive dialog screen, tap the “Group and Sort” option on the Budget overview screen.
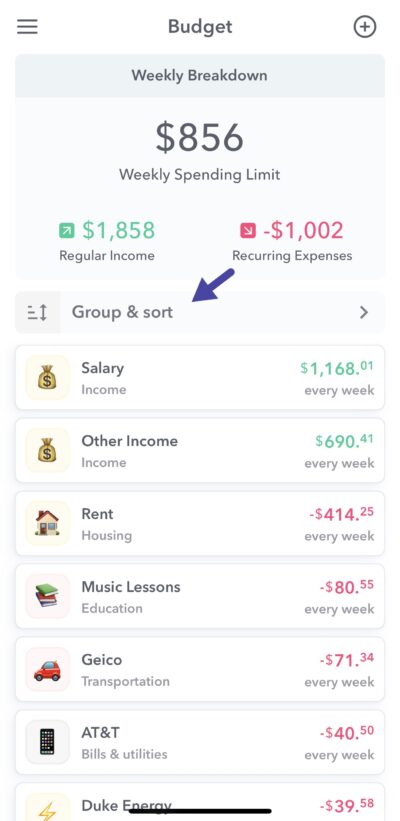
This brings up the group modal.
Tap group and
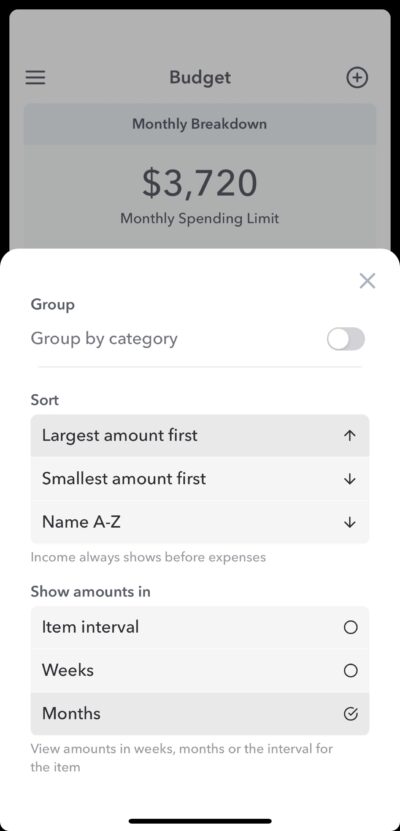
From here you can change how you view your budget items.
Sort
You can change the order in which your budget items appear.
- Largest amount first
- Smallest amount first
- Name A-Z
Show amounts in
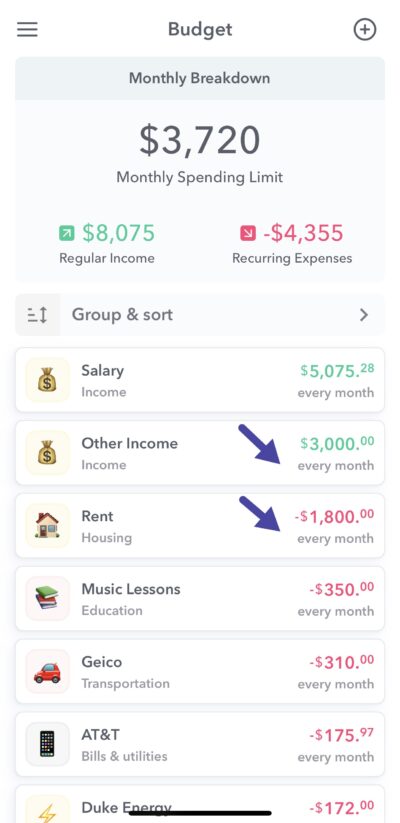
Weekly works by breaking all income and expenses into their weekly equivalents. But if you want to see them in their monthly equivalents or in the time interval that they they are due in, then you can chose that under “Show amounts in”.
Here is an example of what it looks like if you budget if you choose to show them in the monthly equivalent.
How do I auto-build my budget?
Weekly’s auto-build budget tool detects regularly recurring transactions in your bank accounts to assist in building your budget. It’s a great tool for first-time users looking to build an accurate budget.
Connect Your Bank Accounts
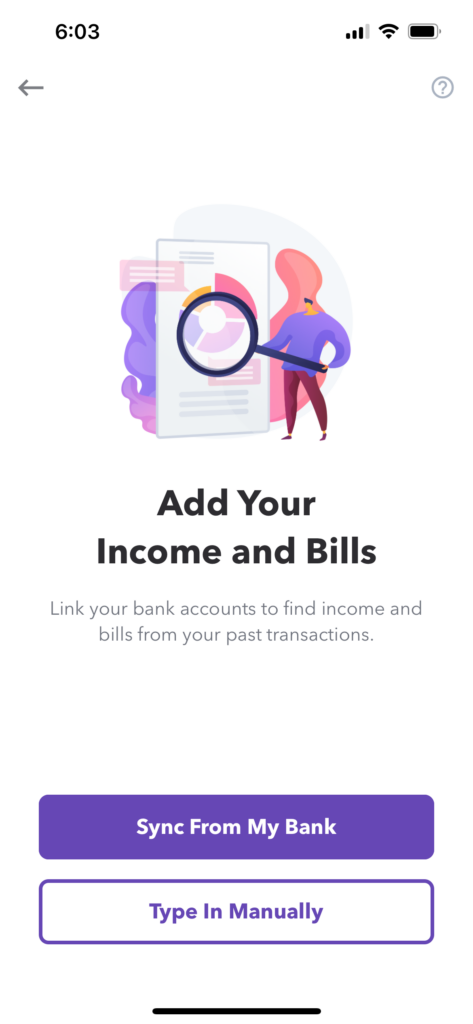
Link your bank accounts by tapping “Sync From My Bank”. Connect all the accounts you use to receive income or pay bills. The more information Weekly has, the more spot on Weekly can be in determining your recurring payments. (Weekly uses Plaid – a third party service provider – to connect to your bank. We don’t store your bank login information.)
Review Your Recurring Payments
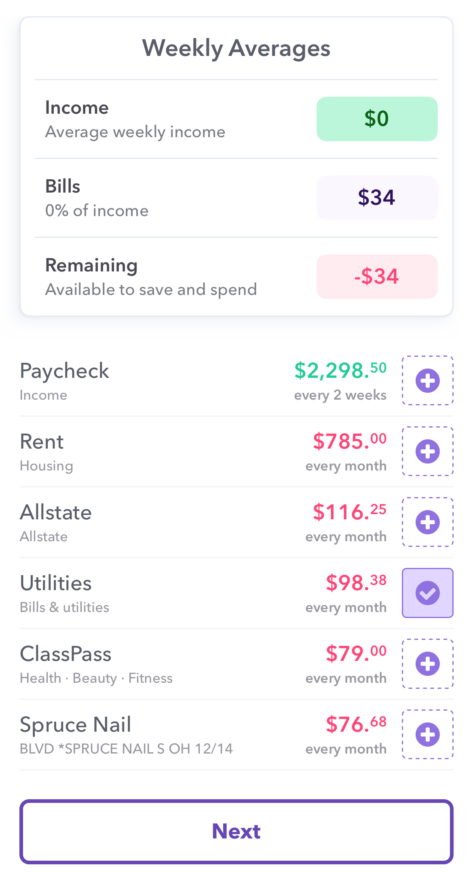
Next, Weekly will use transactions to your bank accounts to identify things like your income and recurring bills. A list of potential recurring payments is generated. Each item will display the average amount spent and the frequency of the payment (every 2 weeks, every month, etc.). Tap the “+” icon to add the recurring payment or income transaction as a budget item in your budget.
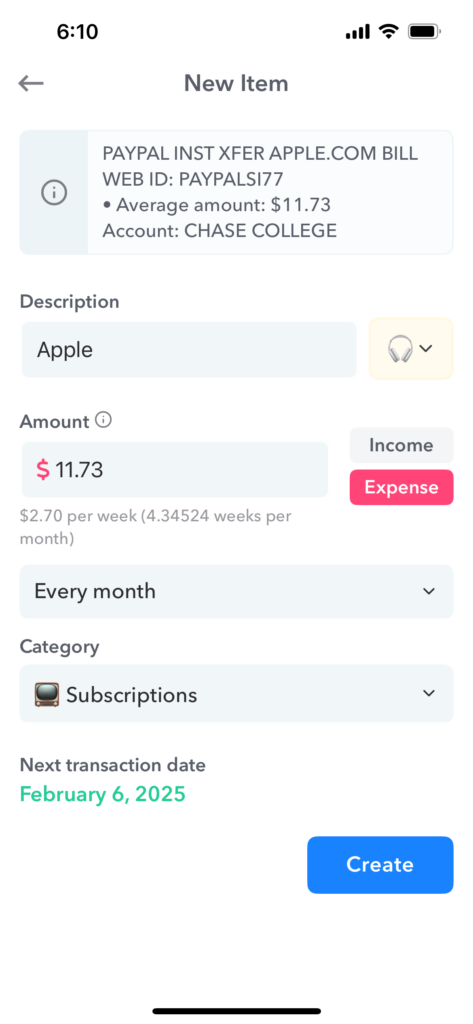
If something needs adjusting, you can change the amount, category, and frequency on this screen. Don’t forget to select an emoji to customize your app experience! Click ‘Create’ to add it to your budget.
NOTE: It’s important to be realistic with yourself when building your budget, in order to get the most out of your Weekly experience. For example, if you pay road tolls 5 days a week, it’s a good idea to add that to your budget starting out. Yes, you could take the longer way to work to save money, but if your current habits reflect that there is a recurring weekly payment, it’s best to add it to the budget. You can always change this later on if your spending habits change.
Review Your Averages
Once completed, tap ‘Next’. You will then be shows an screen with your average weekly income, bills, and remaining money to save and spend.
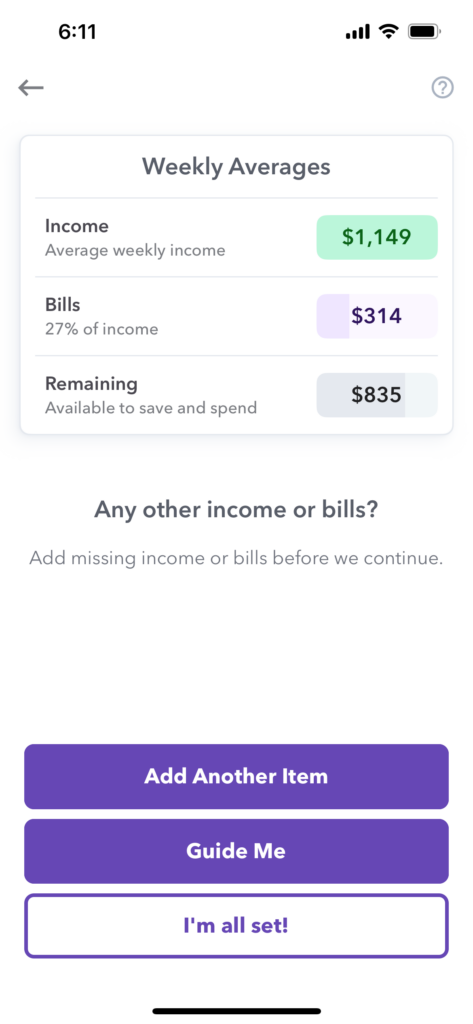
Did auto-build miss something? Selecting ‘Add Another Item’ will give you the option to add any missing income or bills.
‘Guide Me’ will walk you through step-by-step on inputting your income and committed expenses. To learn more, check out this article.
Conclusion
Congrats! You’re one step closer to building a budget! Auto-build streamlined the process of identifying recurring payments and income by looking at your actual bank transactions. Next, you’ll decide how much you want to set aside for your savings goals as Funds.
Add a Budget Item
A budget item is a recurring expense or is regular income. Adding a new item to your budget can be done from the budget overview screen by tapping the (+) button. There you will see a screen that allows you to add a new item.
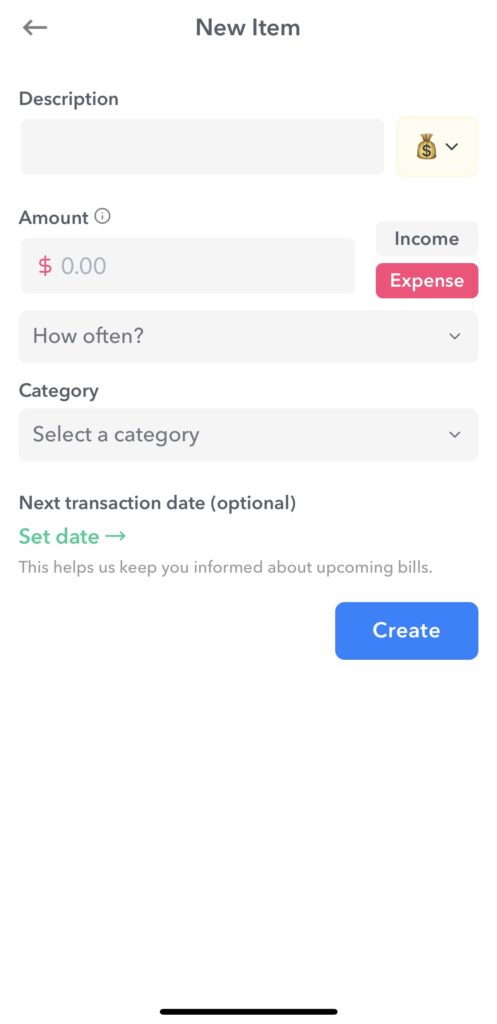
Guide to Adding New Items
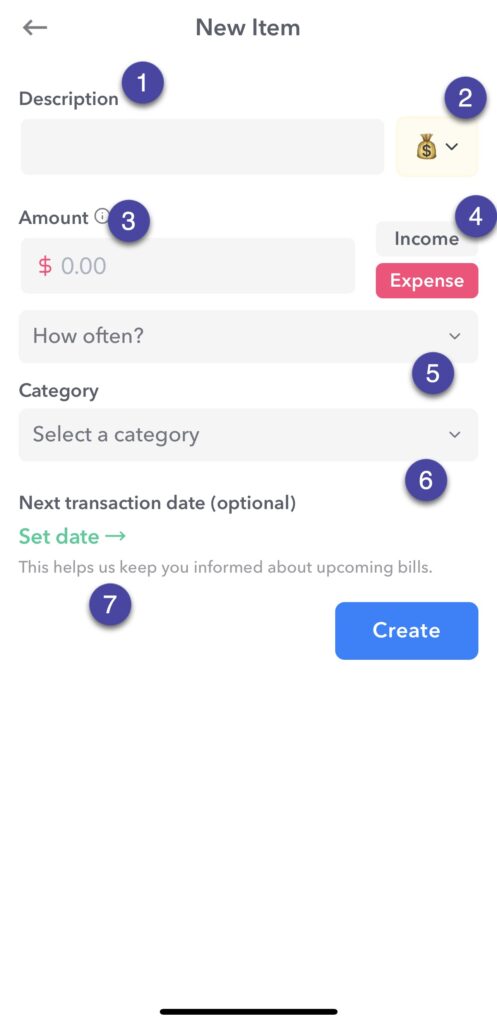
1 – Description
This is the description of the income or expense. Think “Rent”, “Mortgage” or “Hulu” or in the case of an income item maybe “My main job”.
2 – Emoji
If you’d like, pick a fun emoji for this budget item.
3 – Amount
This is the amount of the budget item. So if you are paying $39.99 for car insurance a month, this is where you add the $39.99. If you are adding a paycheck, we recommend adding the total paycheck value after taxes.
4 – Choose “Income” or “Expense”
Is this money coming in or money going out?
5 – Interval
How often does this expense or income happen? Does it happen every month? Bi-weekly? Every quarter? Choose the interval for this budget item.
6 – Category
Choose a category for this item. Categories include
- Bills & utilities
- Donations
- Education
- Health – Beauty – Fitness
- Housing
- Income
- Kids
- Loan Payments
7 – Next Transaction Date (optional)
If you like, you can add the date of the next transaction for this budget item. So if you rent or mortgage is due by 6th every month, you can add in the next transaction date at the 6th of the next month. The next transaction date is used a couple of ways. First, we use it to show which bills are coming due in the “Upcoming Items” report and it also helps map this budget items to transactions when they are downloaded from your bank.
If you don’t know the next transaction date, don’t worry, we actually set it for after we download your first transaction.
Relaunching Onboarding Sequence
When you first create your Weekly account, we guide you through an onboarding that gives you prompts for common budget items. You can add new budget items at any time using the app functionality described above but if you prefer to use the step-by-step flow of the onboarding process, you can also through the onboarding flow again and add budget items that way. You do this by tapping main menu in the top left, then tapping “Settings” and “Review budget items”.